3d christmas countdown tree drawer stacker
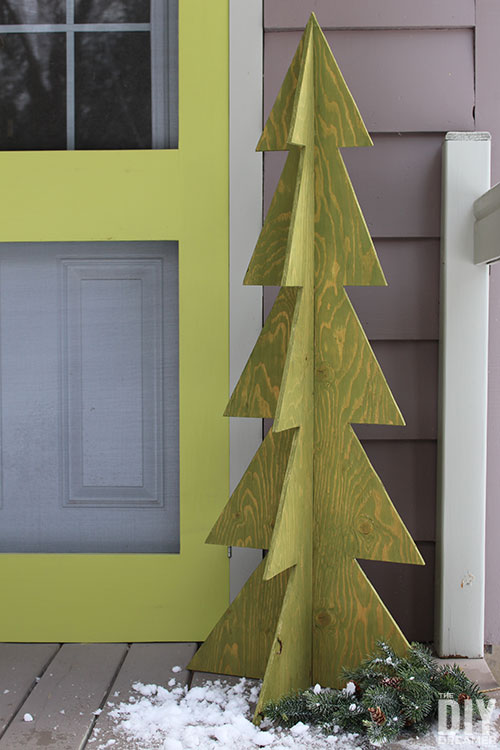
This 3D Wood Christmas Tree measures 4 feet and makes a great outdoor decoration.

Deck the Home with Outdoor Decor
This is the 4th week of the Deck the Home challenge! Woot woot!
Last week's theme was Christmas wood sign. I shared a Quick and Easy Christmas Sign.
I'm truly loving the weekly Christmas themed challenges!
This week's theme is Christmas Outdoor Decor!
It's the perfect occasion to make a 4 foot 3D Wood Christmas Tree I have been wanting to make ever since I came across old wood Christmas ornaments my Dad made.
Years ago, my Dad had made 3D wood ornaments for our Christmas tree. He had made 3D trees, and 3D snowmen.
They were little wood pieces with slots that interlocked into 3D ornaments.
When I came across them again last year, I thought they would love wonderful as giant 3D Christmas decorations.
P.S. I made a 3D wood snowman too!
This post also contains some affiliate links for your convenience. Click here to read my full disclosure policy .

How to make a 3D Wood Christmas Tree
Supplies:
- Plywood – 2 pieces of plywood 4′ by 24″ 5/8″ thick (One 4′ by 24″ piece of plywood cut in 4 would give you enough plywood to make two 3D wood Christmas trees.)
- Paper
- Outdoor Paint
- Paper towel
Tools:
- Pencil
- Ruler
- Jigsaw
- Orbital sander
- Paint brush
Instructions:
How to make a Christmas tree shape to make a 3D cut out
Step 1: Draw desired tree shape onto a piece of paper.
Use a ruler to draw a vertical line in the center of the paper.

Divide the paper in five by drawing four horizontal lines.

Make dots on each line (keep the vertical line centered) gradually increasing the length with each line until you have 5 sets of dots.

Add dots on the vertical line in the center of the first four sections.

To draw the tree, start by drawing the top triangle by starting at the top of the vertical line and joining it to the first two dots on the first line.
To draw the next triangle, line your ruler with the dot in the middle of the first triangle to the dot on the second line.
Draw the line starting at the horizontal line to the dot.
Proceed the same way with the other sections by going downwards each section until the entire tree is drawn.

Step 2: Time to start drawing one tree onto the first piece of plywood. Using the same method as above, by converting the centimeters into inches.

- The tree is 4′ high
- Horizontal lines at every 9.6″
- First line: 9″ wide
- Second line: 11″ wide
- Third line: 14″ wide
- Fourth line: 17″ wide
- Bottom: 20″ wide


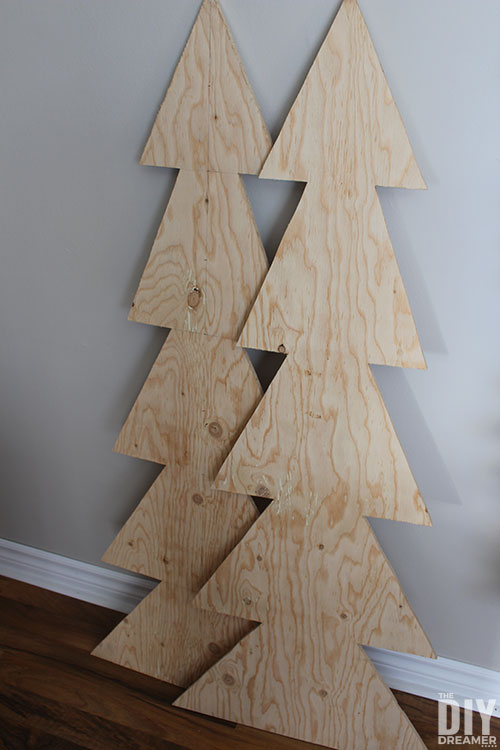
Step 3: Use a jigsaw to cut out the tree.
We started by cutting the top part of the tree.


We proceeded to cut all the horizontal lines.


And we finished off with all the angle cuts.


Step 4: We placed the tree cut out over the other plywood and traced it. (We could have drawn the tree again on the plywood, but it was faster to just trace it.)


We used a ruler (actually our level hehe) to continue the lines to the edge of the plywood. We did this because it's easier to start cutting with a straight line leading to the desired cut location.


Step 5: We cut out the second tree.
This time, after cutting the top portion, we cut all the horizontal lines on both sides and finished off with all the angle cuts. It seemed faster doing it this way, rather than doing once side after the other.
How to make slots for 3D Wood Christmas tree fit together
Step 6: To be able to insert the two pieces inside each other, slots need to be cut out of both.
To make the first slot we marked the middle of the bottom of the second triangle and drew a line up to the point of the first triangle. The line measured 19″. We made two lines on each side of the middle line to get 5/8″ in width (the thickness of the plywood).


Step 7: We used a jigsaw to cut out the slot.


Once we were done cutting it out, we tested the slot to make sure the other piece would fit in. We had to make one more cut to give it a little more space to fit.
Step 8: To make the slot on the second tree, we had made a line in the middle of the tree starting at the top of the third triangle all the way down. The line measured 29″. We made two lines on each side of the middle line to get 5/8″ in width.


Step 9: We used a jigsaw to cut out the slot.


Like in step 7, we tested the slot and we had to make the slot a little bit bigger for them to fit together.
Step 10: Using 120 grit sand paper, we sanded the trees to make them smooth. (It also removes the pencil marks.)

Step 11: We dry fitted the trees together to make sure they fit perfectly.


Doesn't the 3D wood tree already look great? Love it!
Stain tree cut outs
Step 12: Time to paint the 3D Christmas tree cut outs! I used the same staining technique I usually use. I used green paint called Portsmouth Olive from BEHR Paint, it's the same green I used for my outdoor Christmas countdown marquee sign.


Step 13: Once the paint was nice and dry, we pieced together the two Christmas tree cut outs to reveal our beautiful 3D Wood Christmas Tree!
DIY Outdoor Christmas Decorations
3D Christmas Decorations

I hope my 3D Christmas decoration has inspired you to create outdoor decorations too!
The 3D Christmas Tree looks wonderful next to a Wood Christmas Tree Lantern.
Have a great day my lovelies!
Christine
Materials
- Plywood – 2 pieces of plywood 4′ by 24″ 5/8″ thick - See notes below
- Paper
- Outdoor Paint
- Paper towel
Tools
- Pencil
- Ruler
- Jigsaw
- Orbital sander
- Paint brush
Notes
Tree dimensions:
- The tree is 4′ high
- Horizontal lines at every 9.6″
- First line: 9″ wide
- Second line: 11″ wide
- Third line: 14″ wide
- Fourth line: 17″ wide
- Bottom: 20″ wide
Source: https://thediydreamer.com/christmas/how-to-make-a-3d-wood-christmas-tree/
0 Response to "3d christmas countdown tree drawer stacker"
Post a Comment